NOIR ET BLANC
Instructions
by Nasanen
● The Noir et Blanc application is a black-and-white photo editor. Because of the simplicity of its use, you can easily and quickly produce high-quality photographic images with Noir et Blanc.
● For avoiding unnecessary visual clutter on the display, the features can mainly be found in menus.
● Selecting a menu item for a specific feature, e.g., for the adjustment of the tone curve, results in the displaying of a small window containing the tools for making the adjustments. The adjustments made are shown immediately in the displayed image. After clicking the OK button, the window closes, and you can choose another feature. Alternatively, you can cancel the edit by clicking the Cancel button.
● A small set of tool-like features, such as cloning and selecting an area for cropping, copying, or local processing, can be accessed by clicking the respective buttons in a horizontal toolbar.
Menu File
Import/Open
‘Import’ allows you to display and edit numerous image types including e.g. ‘JPG’, ‘HEIC’, ‘TIFF’ and various camera raw images such as ‘CR2’, ‘NEF’, and ‘ARW’. Files of these types are first converted to ‘PNG’ files and then opened. Note that the ‘PNG’ format can convey virtually all the original image information. It supports both 8 and 16 bits-per-channel images. Each colour channel, red, green, and blue, can be presented with an accuracy of 8 bits (256 different values: 0-255) or 16 bits (65536 different values: 0-65535).
How does ‘Import’ work? In the Import dialogue, first select a file to be converted using the ordinary file-open-dialogue. After this, the text ‘Converted’ appears in a text box in the dialogue. Then press ‘OK’ and the image will be displayed as a monochrome image (see below ‘Monochrome conversion’). Instead, pressing ‘Cancel’ will cancel the import.
Opening a PNG-file. Noir et Blanc opens directly PNG image files using the ordinary file open dialogue.
If the photo imported or opened is a colour image, pressing ‘OK’ automatically results in the displaying of the ‘Hue/Saturation Colour Mixer’ dialogue. With this, you can determine how different colour components are mixed in the monochrome conversion of the colour image (see below ‘Monochrome conversion’ for other possibilities of monochrome conversion).
Export/Save
How does ‘Export’ work? First, press the button “Give name and type of file”. This displays a dialogue for giving the name and type for the file to be exported. You can export images as types 'TIFF', 'HEIC', 'JPG', 'PNG', 'PDF', 'GIF', and 'BMP'. After pressing ‘Save’ in the dialogue, the image will be converted to the desired format and the text ‘Converted’ will appear in a text box. After pressing the OK-button, the conversion will be saved to the disk. Pressing ‘Cancel’ will cancel the export.
Saving a 'png' file. Noir et Blanc saves 'png' image files using the ordinary file save dialogue.
Close Menu Item/Close Button
When clicking the Close Menu Item or the Close Button, the currently open image will immediately be closed if it has not been edited or changed after saving. If the image has been edited but not saved, a warning message will be displayed asking whether you would like to ‘Save the PNG image before closing?’. The answer alternatives are ‘Yes,’ ‘No,’ and ‘Cancel Close.’
File Info
“File Info” allows you to view image metadata if that is available. You can choose ‘Selected metadata’ or ‘Raw metadata’. ‘Selected metadata’ contains a selection of the main metadata items in a simple list. ‘Raw metadata’ contains all metadata available in the image file.
Menu Edit
Undo
A change made to the photo can be undone by choosing ‘Undo’.
Redo
An undone change can be redone by choosing ‘Redo’.
Multiple undo and redo operations can be done.
Copy to Clipboard
An image displayed can be copied to the clipboard to be used elsewhere.
Menu Monochrome Conversion
A colour photograph can be converted into monochrome, i.e., black-and-white, format before further processing. The way this conversion is done can often have a great effect on how the image grey levels look like.
Basic Conversion [preserves luminance values]
The ‘Basic Conversion’ converts the colour image so that the luminance, i.e. brightness, in the converted image will be approximately the same as in the colour image. This is achieved by using the following weights for the red, green, and blue colour components at each pixel: Luminance = 0.2125xRed+0.7154xGreen+0.0721xBlue. [see Poynton C., GammaFAQ, www.poynton.com].
RGB Mixer Conversion
In this case, a dialogue is displayed for adjusting the red, green and blue weights.
Hue & Saturation Mixer Conversion (default)
This is the default method, since it allows you to make the conversion adjustment in a very simple way. There are two sliders, the hue and saturation slider, for adjusting colour weights as described below.
Using hue and saturation for colour mixing is essentially equivalent to using red, green and blue components, since all colours can be described by hue and saturation. The simplicity follows from the fact that you only have to navigate in a two-dimensional space (hue and saturation) instead of a three-dimensional space (red, green, and blue).
Further, a very fast and easy approach is to first adjust hue and then fine-tune the result by adjusting saturation.
Menu Image
Rotate
The following image rotations can be done:
— 90 deg Left
— 90 deg Right
— 180 deg (= upside down)
Resize
Image size can be reduced or increased.
Crop
An image can be cut so that only a desired rectangular or circular part of it remains visible. This is often done to improve the composition or to remove non-essential parts of the photo.
Menu Enhance
Tone Curve: contrast, gamma, etc.
Tone curve determines how the grey level values of the original image are presented in the edited image. This feature allows you to change the contrast, darkness/lightness, or only a part of the grey level values in the edited image virtually in an unlimited way by means of the Tone Curve dialogue.
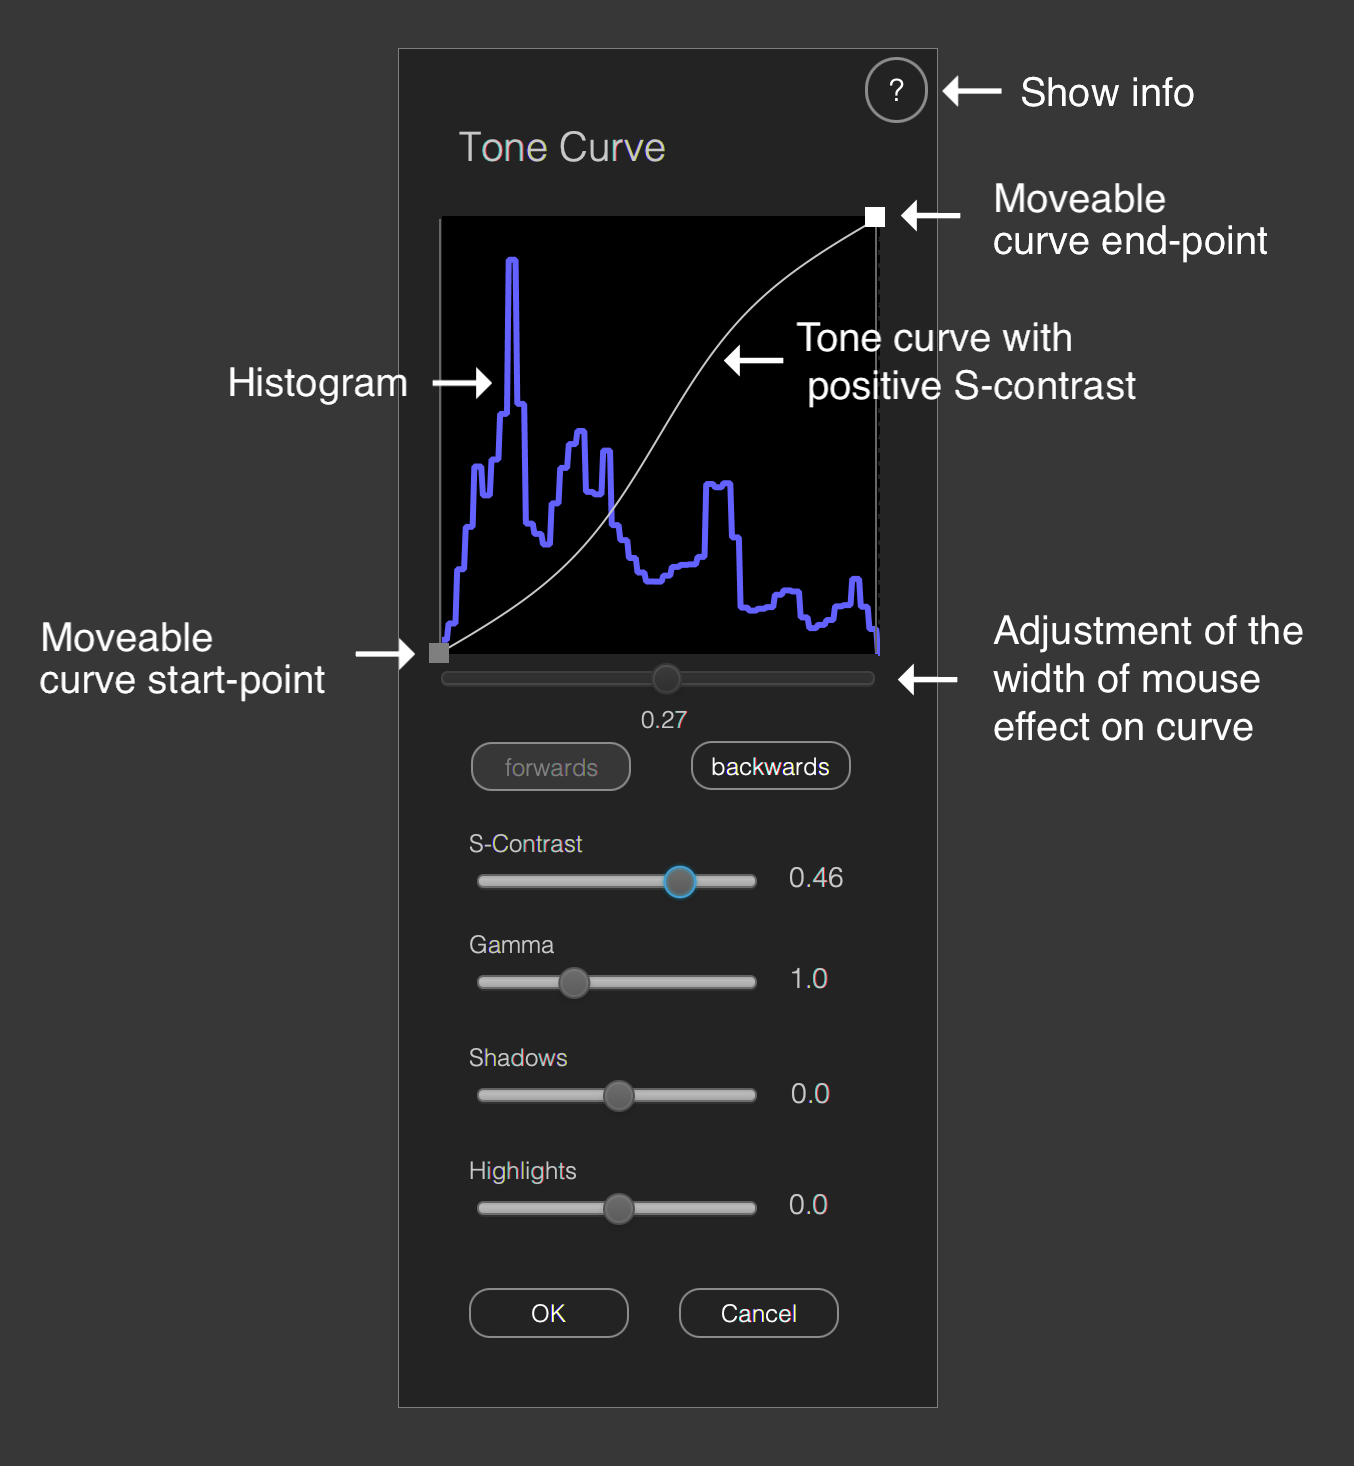
The Tone Curve dialogue shows the tone curve as well as the histogram for the image grey scale values from zero to the maximum value (horizontal axis). The tone curve expresses how each input grey level value of the image being edited will be transformed into output values (vertical axis). If the tone curve is a diagonal line, no transformation will occur. Therefore, the output, i.e., the resulting image, is the same as the input image. The histogram describes the proportion of each grey level value in the image. If you change the tone curve, the histogram changes, too.
The tone curve can be adjusted by using the following sliders: S-contrast slider, Gamma slider, Shadows slider, and Highlights slider (described below).
In addition, the tone curve can be adjusted manually using a mouse or some other pointing device. You can modify the shape of the curve by raising/lowering it locally. The width of this effect can be adjusted using the slider just below the tone curve.
S-contrast slider. S-contrast refers to a sigmoid (s-shaped) curve, which, in the case of positive S-contrast value, increases the contrast of the image without changing the lower or higher end-points of the curve. An S-contrast value equal to zero corresponds to a direct diagonal line between the start- and end-points. A negative S-contrast value produces an inverse sigmoidal curve, which results in a lower image contrast.
Gamma slider. The gamma slider changes the exponent of the gamma curve. [The gamma curve is a power function: g(x) = xgamma, where x is the grey level value between 0.0 and 1.0]. With gamma equal to unity (gamma=1.0), the gamma curve is linear, i.e., a straight line between the start- and end-points of the curve. When the gamma value is greater than unity (gamma>1.0), the curve is non-linear and the image is darker and has a higher degree of contrast. When the gamma value is below unity (gamma<1.0), the gamma curve is non-linear and the image is brighter and has a smaller degree of contrast.
Shadows slider. This allows you to control the brightness of the dark tones of the image by changing the lower part of the tone curve.
Highlights slider. This allows you to control the brightness of the light tones of the image by changing the upper part of the tone curve.
How to obtain ‘levels’ feature? The ‘levels’ feature refers to adjusting the grey level range at low or high grey level values. This can be achieved by moving the start-point rectangle and/or the end-point rectangle horizontally by mouse. Note, that the mid-levels can be adjusted by using the Gamma slider.
Adjusting maximum and minimum. The maximum and minimum grey level values can be adjusted by moving the end-point rectangle and start-point rectangles vertically by a desired degree using the mouse.
Sepia
Sepia is a traditional photographic method that gives photographs a warm and brownish hue. In addition to brownish hues, digital photo editing allows using any possible hue, e.g., red, orange, or green, as well.
In Noir et Blanc, the sepia feature can be accessed by clicking menu item ‘Sepia’ in the Enhance Menu. This opens a dialogue, where there is a checked pattern, each check has a warmish hue, which can be used for sepia. You can select one of the hues by clicking it by mouse. Below the checked pattern, there is an ‘All possible hues’ -slider by which you can select any possible hue. Finally, there is a ‘Magnitude’ -slider. Using it, you can determine how strongly that hue is applied to the photo.
Sharpen
The ‘Sharpen’ feature uses the simple unsharp-mask method for sharpening the image. In the ‘Sharpen’ dialogue, the extent of sharpening is controlled by a slider.
Blur
The ‘Blur’ feature uses the Gaussian filter for blurring the image. In the ‘Blur’ dialogue, the extent of blurring is controlled by a slider.
Vignette
Vignette is a technique by which the corners and edges of a photograph can be made darker or lighter than the centre. Here, the shape of the vignette is oval, where the width and height are proportional to the width and height of the picture. In the ‘Vignette’ dialogue you can adjust the size, softness and the strength of the vignette. Softness refers to gradual change of lightness at the border of a vignette edge. Strength zero means that there is no vignette visible. Strength +1.0 means that the vignette is black, and strength -1.0 means that the vignette is white.
A very subtle vignette effect can be created by using a high value of softness together with a slightly greater or smaller than zero strength.
A vignette can, for example, be used to emphasize the centre part of the picture, or to produce some additional subtle tonal change in an image having large surfaces of even grey level.
Add Border
This feature allows you to create a borderline around the image. For a rectangular image, the borderline is rectangular. If you have used circular cropping, the borderline will be circular. There are two sliders with which you can adjust the width of the borderline and its lightness.
Menu View
Zoom In
‘Zoom in’ will display the photo as lager.
Zoom Out
‘Zoom out’ will display the photo as smaller.
Fit to Window
This will adjust the size of displayed so that it will comfortably fit into the window.
Background brightness
In the Noir et Blanc application, background brightness can be adjusted easily and quickly. Background may affect greatly on the perception of the overall lightness of a picture. Therefore, it is very useful to do adjustments using such a background on which the picture is meant to be displayed or to check that the tone adjustments work well with different background brightnesses.
Increase Background Brightness
This increases the background lightness a little (one 255th the maximum brightness value).
Decrease Background Brightness
This decreases the background lightness a little (one 255th of the maximum brightness value).
Set Background Brightness to White
This will set the background brightness to the maximum value.
Set Background Brightness to Default
This will set the background brightness to the default value, which is dark grey.
Toolbar Buttons
Close Button
Clicking this button results in closing the picture document, if it has been edited and saved.
Rect. Select Button
You can select a rectangular area inside the picture for cropping the picture. Clicking the Select button results in adding an adjustable grid on the displayed picture. At first, the grid is of the same size as the picture displayed. You can adjust the size and the location of the grid by using the mouse. The border(s) of the grid can be moved by dragging the corners or sides of the grid. When the grid is smaller than the displayed picture, you can drag it by mouse so that the mouse cursor (hand) is inside the grid.
Circ. Select Button
Circular selection allows you to do circular cropping. In addition, you can edit the Tone Curve and do the Sharpen or Blur feature within in the circular selection. If you choose to use inverse selection in the Tone Curve, Sharpen or Blur dialogues, the area outside the circular selection will be edited. After circular cropping, the background will be fully transparent. The transparency will be preserved in the saved PNG-files and exported HEIC-files. In the exported JPG-files, the background will be white.
Clone Button
Cloning allows you to copy pixels from one location to another. The borders of the pixel arrays at the destination positions are smoothed. Cloning can be used, for example, to remove unwanted ‘blemishes’ in the picture. The size of the clone area can be adjusted using the slider on the right-hand side of the Clone Button.
Cloning can be done in the following way: Press the Clone button. Set the size of the clone area. Move the mouse cursor to the source area and press the option button briefly. Move the mouse cursor to the start point of the destination area. Finally, keep the left mouse button pressed and move the mouse so that the pixels will appear in the destination area.
Is It Possible to Edit Colour Images with Noir et Blanc?
Yes, it is possible to edit colour images. When you open an image, the ‘Hue/Saturation Colour Mixer’ dialogue is displayed. Pressing the Cancel button at this point, results in displaying the original colour image. This can be edited with the same features as the monochrome images. In addition, there is a possibility to adjust the 'Colourfulness' of the image. Saving/exporting colour is similar to saving/exporting monochrome images.
A useful tip: using the Sepia/Colouring feature, you can adjust the colour of a colour image towards any hue, not just along the cold-warm axis of the temperature adjustment used in many other photo editors.
Colour Profiles
Digital photographs usually have a colour profile (‘ICC colour profile’), which describes how the colours of a photograph should be shown, e.g., on a computer display. Displays also have colour profiles, which describe how they show colours. If the photo colour profile and the display colour profile are different, the picture colours have to be transformed so that when displayed they won’t be distorted, e.g., be too saturated.
However, since purely black-and-white images do not have colours, we don’t have to be worried about how colours look like. In that case, the only important thing is how the luminance is displayed. This is described by the so-called gamma curve, which is a power function so that at any one pixel the displayed luminance is equal to the picture brightness (between 0 and 1) raised to the power of gamma. Gamma is a constant having a value equal to 2.2. In practice, it may deviate from this to some extent (see Display Gamma).
However, when sepia is used, it would be beneficial if colours were managed to get more accurate results. This means that the picture is transformed, e.g., from the sRGB or the AdobeRGB1998 colour profile to the DisplayP3 colour profile. When writing this, DisplayP3 is usually used in modern Mac displays, as well as in modern displays of other manufacturers. Therefore, it is the default display profile used in Noir et Blanc. If you are using sepia, it would be good if you checked your display colour profile. If it is not Display P3 and your display supports that colour profile, it might be a good idea to change it to Display P3.
When a photograph is opened, its metadata is read. Metadata contains, among other things, the information about the colour profile. When an edited picture is saved/exported, Noir et Blanc writes the metadata back to the picture file.